
AVD classic retirement – how to avoid surprises
Azure Virtual Desktop (classic) (short AVD classic) is being retired on the 30th of September 2026 and will stop working after this day. Classic used its own PowerShell cmdlets, REST surfaces and service objects that don’t appear as Azure Resource Manager (short ARM) resources, so they aren’t manageable from the Azure portal or governed by Azure role-based access control (short RBAC). The modern Azure Virtual Desktop is integrated with the Azure portal, RBAC, improved diagnostics, better networking/security and scaling/automation features.
Below I’ll walk through who should migrate, when to pick manual vs. automated migration, the exact prerequisites, playbooks for both migration methods (manual and automated), common pitfalls, and the post‑migration work you must do before the deadline.
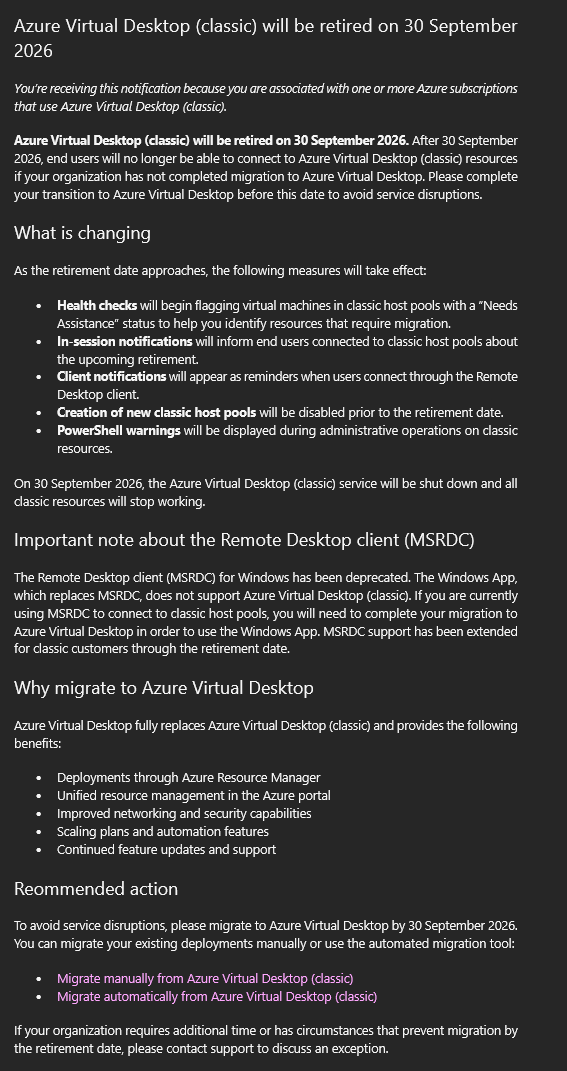
Does this affect you?
If you created host pools, application groups or session hosts with the classic release, those objects don’t exist as ARM resources and won’t show up in your Azure subscription. That’s the key test: if your deployment is still managed through the classic cmdlets / portal surfaces rather than the Azure portal, you are in scope and you need to migrate.
Why migrate
Moving to ARM gives you portal‑based management, Azure RBAC for fine‑grained access control, better Log Analytics integration and AVD Insights, and compatibility with future AVD features. Classic objects won’t receive new ARM‑targeted features and will stop working after the retirement date, so this isn’t optional.
Important dates & exceptions
The hard retirement date is the 30th of September 2026. Beginning now you should inventory and plan the migration, if you’re affected. Don’t wait until the last day. If you have more than 500 application groups or operate multi‑tenant environments, you may be eligible for an exemption! Open therefore a support request in the Azure portal and follow the exemption workflow early, because those requests take time to evaluate.
Prerequisites
Before you start migrating collect the following information and ensure the right permissions are in place:
- An Azure subscription where ARM objects will be created.
- Roles on the target subscription: Contributor and User Access Administrator.
- An inventory of host pools, application groups and user assignments, and a list of any custom automation or third‑party integrations that reference classic resource IDs.
- For automated migration: RDS Contributor permissions on the classic tenant or the host pools you’ll migrate.
- For automated migration: a PowerShell environment with recent Az.DesktopVirtualization and Az.Resources modules, the Microsoft.RdInfra.RDPowershell module (required version 1.0.3414.0), and the Microsoft.RdInfra.RDPowershell.Migration module.
Note: the Microsoft.RdInfra.RDPowershell module does not work in PowerShell Core. Use therefore Windows PowerShell.
Which migration path to choose
Manual migration playbook
Manual migration is relatively straightforward: create ARM host pools and application groups in the Azure portal, register or reconfigure VMs to join the new host pools, recreate your RemoteApp/desktop app groups, and move users. Use manual migration when you can afford to recreate objects, and you have only a few VMs or users to move.
Here is a detailed “to-do” list for the manual migration method:
- Inventory and plan
- Export a list of classic host pools, application groups, session hosts and user assignments.
- Identify host pools that are simple to recreate (gallery images, standard configurations).
- Create ARM host pools and application groups in the Azure portal.
- Register existing VMs to the new ARM host pool. Register hosts in small batches to reduce risk.
- Recreate application groups and publish the same apps. Assign users or groups to these new app groups.
- Stage cutover by moving users in small groups, validating session behavior and FSLogix/profile handling for each group.
- Finalize when validation is complete. Update automation/scripts to reference ARM resource IDs and delete the classic objects when you’re ready.
Automated migration playbook
The migration module is designed to reduce manual effort and preserve availability during the transition. It creates ARM workspaces, host pools and application groups, optionally copies user assignments, and keeps VMs available in both classic and new host pools so users can continue working while you validate.
- Prepare PowerShell and permissions
- Install/update core modules:
-
Get-Module Az.Resources
-
Get-Module Az.DesktopVirtualization
-
Install-Module Az.Resources
-
Install-Module Az.DesktopVirtualization
-
Import-Module Az.Resources
-
Import-Module Az.DesktopVirtualization
-
- Remove old RDInfra PowerShell module, install required RDInfra Powershell module and validate that the right version (1.0.3414.0) is installed:
-
Uninstall-Module -Name Microsoft.RDInfra.RDPowershell -AllVersions
-
Install-Module -Name Microsoft.RDInfra.RDPowershell -RequiredVersion 1.0.3414.0 -Force
-
Import-Module Microsoft.RDInfra.RDPowershell
-
Get-Module Microsoft.RDInfra.RDPowershell
-
- Prepare and install the migration module:
-
Install-Module -Name PackageManagement -Repository PSGallery -Force
-
Install-Module -Name PowerShellGet -Repository PSGallery -Force
-
- Restart your PowerShell session
- Prepare and install the migration module:
-
Install-Module -Name Microsoft.RdInfra.RDPowershell.Migration -AllowClobber
-
Import-Module <Full path to the location of the migration module>\Microsoft.RdInfra.RDPowershell.Migration.psd1
-
- After successfully installing all the right PowerShell modules, sign in to classic and ARM, select subscription:
-
Add-RdsAccount -DeploymentUrl https://rdbroker.wvd.microsoft.com
-
Login-AzAccount
-
Select-AzSubscription -SubscriptionId <subID>
-
- Register the resource provider:
-
Register-AzResourceProvider -ProviderNamespace Microsoft.DesktopVirtualization
-
Or via Azure Portal: Subscriptions → Resource providers → Microsoft.DesktopVirtualization → Re-register.
-
- Install/update core modules:
- Map and validate
-
- Generate a mapping CSV to review where resources will land:
-
Get-RdsHostPoolMigrationMapping -Tenant <Tenant> -HostPool <HostPool> -Location <Region> -OutputFile '<path>\mapping.csv'
-
- Review mapping.csv and adjust your plan before starting.
- Generate a mapping CSV to review where resources will land:
- Start migration
-
-
Start per-tenant (all host pools) or per host pool:
-
Start-RdsHostPoolMigration -Tenant <Tenant> -Location <Region>
-
Start-RdsHostPoolMigration -Tenant <Tenant> -HostPool <HostPool> -CopyUserAssignments $true -Location <Region>
-
Start-RdsHostPoolMigration -Tenant <Tenant> -HostPool <HostPool> -CopyUserAssignments $false -Location <Region>
-
-
Use an existing workspace by resource ID:
-
Start-RdsHostPoolMigration -Tenant <Tenant> -HostPool <HostPool> -CopyUserAssignments $true -Location <Region> -Workspace <workspaceResourceId>
-
-
Lookup a workspace resource ID if needed:
-
Get-AzWvdWorkspace -WorkspaceName <workspace> -ResourceGroupName <rgName> | fl
-
-
Expect object creation to take ~15 minutes (longer if copying assignments).
-
- User-assignment behavior and quota
-
- User assignment migration modes:
- CopyUserAssignments $true — copies user assignments to ARM application groups (users see feeds for both classic and ARM).
- CopyUserAssignments $false — leaves assignments unchanged (users see only classic feeds until you assign).
- Quota note: copying is limited by subscription role assignment quota (roughly ~2,000 assignments). If quota is insufficient you’ll get: “Insufficient role assignment quota to copy user assignments. Rerun command without the -CopyUserAssignments switch to migrate.”
- User assignment migration modes:
- What the module creates and naming
-
- After initiating Start-RdsHostPoolMigration you should see:
- A workspace resource group (named from the tenant).
- A host-pool resource group named Tenantname_originalHostPoolName with the host pool and application groups.
- New ARM service objects and any copied user assignments.
- VMs remain available in both classic and ARM host pools during validation so user sessions continue.
- The module does NOT configure RBAC or diagnostic settings. Plan to configure these manually.
- After initiating Start-RdsHostPoolMigration you should see:
- Validate
-
- Confirm the new ARM resource groups, workspace, host pool and app groups exist.
- Validate user connections to the new app groups (users should be able to connect to the same session).
- Assign RBAC roles and diagnostics to the new objects as required.
- Testing / hiding instead of deleting
- Hide classic host pool feeds for testing (instead of deleting):
-
Set-RdsHostPoolHidden -Tenant <Tenant> -HostPool <HostPool> -Hidden $true -Location <Region>
-
Set-RdsHostPoolHidden -Tenant <Tenant> -HostPool <HostPool> -Hidden $false -Location <Region>
-
- Note: hiding is for testing only. It does not count as a completed migration.
- Hide classic host pool feeds for testing (instead of deleting):
- Complete, revert, and cleanup
-
-
Finalize migration (deletes classic AVD objects; users will only see ARM feeds afterwards):
-
Complete-RdsHostPoolMigration -Tenant <Tenant> -Location <Region> Complete-RdsHostPoolMigration -Tenant <Tenant> -HostPool <HostPool> -Location <Region>
Note: after completion you may need to explicitly delete the classic tenant if desired.
-
-
Revert before completion (deletes the newly created ARM objects):
-
Revert-RdsHostPoolMigration -Tenant <Tenant> -Location <Region> Revert-RdsHostPoolMigration -Tenant <Tenant> -HostPool <HostPool> -Location <Region>
Note: Revert does NOT delete the workspace or its resource group created by the module. Delete those manually if you want them removed.
-
-
- Troubleshooting tenant access
-
- If you can’t access the tenant:
- Verify your admin account permissions and try: Get-RdsTenant
- If context issues occur, set migration context:
- Ensure Add-RdsAccount was run. Get contexts from global variables: rdMgmtContextandrdMgmtContext and AdalContext
- Then: Set-RdsMigrationContext -RdsContext <rdscontext> -AdalContext <adalcontext>
- If you can’t access the tenant:
Key limits, gotchas and troubleshooting
There are a few common blockers you must plan for. The migration module only creates ARM resources in the US geography, so if your target ARM resources must live outside the US the module won’t help and you have to migrate it manually. The automated migration will fail if your classic environment contains more than 500 application groups. You’ll need to consolidate application groups or request an exemption via Microsoft support. Copying user assignments is capped (about 2,000 per subscription) and the module calculates whether you have sufficient assignment quota. If not, you must migrate assignments manually.
The migration module creates ARM objects but does not set RBAC roles or diagnostic settings. Plan to assign those immediately after the objects appear after the migration. Moving application groups between resource groups after assigning RBAC can remove role assignments, so prefer final resource placement before applying RBAC. If you encounter tenant access errors, check that your account has the required roles and use Get-RdsTenant and Set-RdsMigrationContext to set the correct context. Module and permission/version mismatches are the most frequent cause of failures, so follow the prerequisites checklist carefully.
Post‑migration tasks
Once the migration is validated you need to apply Azure RBAC roles, reconfigure diagnostic settings and Log Analytics, update conditional access or MFA policies that referenced the old objects, and change any automation or Infrastructure as Code templates to target the new ARM resource IDs. Only after you’ve validated users and tooling should you run Complete-RdsHostPoolMigration (automated migration) to delete classic objects and finalize the transition. Until you “finalize the migration”, you can hide classic feeds with Set-RdsHostPoolHidden for testing.
Conclusion
This is a hard deadline: migrate away from Azure Virtual Desktop (classic) before the retirement date. For small or simple deployments manual migration is fine. For anything non‑trivial use the automated migration module and follow the playbook above. Start inventory and planning today, run a pilot host pool, and roll out in controlled waves. Your future self (and your users) will thank you.
Resources
- Manual migration: https://learn.microsoft.com/azure/virtual-desktop/manual-migration
- Automated migration: https://learn.microsoft.com/azure/virtual-desktop/automatic-migration
- Classic retirement & exemption process: https://learn.microsoft.com/previous-versions/azure/virtual-desktop-classic/classic-retirement